Showing posts with label Spine. Show all posts

Sunday, August 22, 2010

Clavichord Day 11 - We're Back! Lid Work & Stain

After a long hiatus, we're back in action!

On our way to finishing the case work, the first small step was to plane down the toolbox lid until it fit nicely in place.


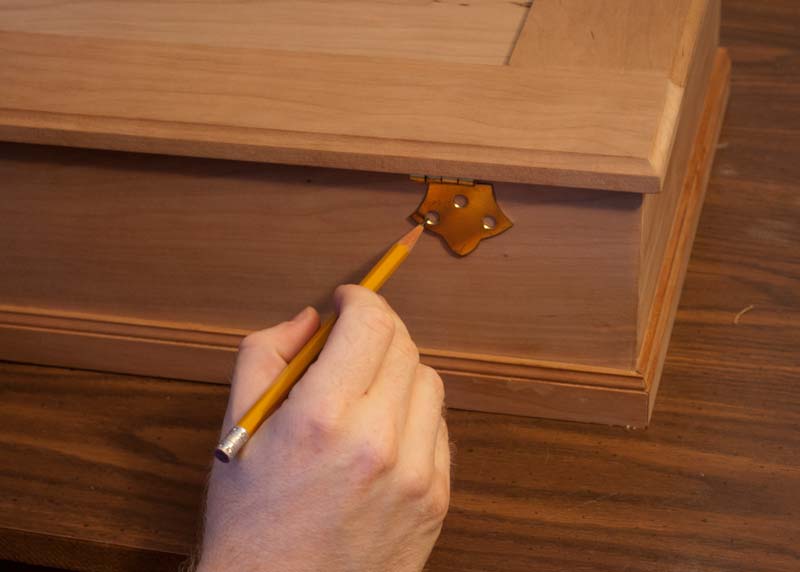
That being done, the last major part of the case to be done was the lid. The job was to get the hinges on the lid and case, so that the lid opens and closes freely with an equal overhang on all sides. The first step was measuring for the exact location of the hinges, and marking the screw holes.


Then, the pilot holes were drilled.


The hinge, perfectly in place.


With the lid in place on the instrument (and floating just a bit above the case, so that later the hinges won't scratch the top of the spine) the holes were marked on the case itself.


A look at the case from behind, with the lid screwed on!


Now, it is time to decorate the case. This will be a long and rewarding project. The look we are going for is a rich red stain on the case, with faux inlays of tortoiseshell surrounded by bands of gold leaf.

First things first. A wood conditioner was applied to all the pieces requiring staining.


Then, the stain itself was applied.


A look at the various pieces of the instrument after 2 coats of stain:
That's all for Day 11. It's fun to be back!

Thursday, September 10, 2009

Clavichord Day 5 - Guide Rack, Belly Rail, Cheek Liner, Tool Box Back and Hitchpin Rails

Today was a long day, and the basic case construction is now complete! So, how did we get here?

First, we had to trim and adjust the guide to fit. The guide rack goes right on top of the backrail, and has slots carved into it. These will keep the keys moving up and down, but not side to side.

Here, the guide rack is clamped in place.


A look at the whole case, with the guide rack glued in on top of the back rail. Notice the vertical slots carved in.


Next, the belly rails and cheek liner were glued in. These pieces, forming an angled and multi-sided face, will eventually make the left-most ledge for the soundboard to rest on. Here's a look at the cheek liner clamped to the right cheek, with the standing belly rail (with mouse hole) already glued to the bottom.


What's a day without some glue cleanup?


A look at the right side of the case. The front, rear and cheek liners, the wrestplank, and belly rails--all making the trapezoidal ledge for the soundboard to sit on later.


Next, the small detail of the little piece of cherry glued to the balance rail and hitchpin block, forming the rear wall of the "tool box." One day, there will be the tuning hammer inside and a fancy lid on top!


The last big project was to get the hitchpin rails done (both treble and bass rails). This meant trimming to size, marking for the pin holes, and gluing them into place.
After trimming, we had to get the rails underneath the plan drawing so we could mark for each little pin hole (later to have hitch pins inside). After securing the rail under the drawing, we had to dimple the wood on each little X, using the awl to gouge through the drawing and into the rail.

Here's a look at the short bass rail after all the pin holes were marked.


Finally, gluing in the rails. First the bass rail, right on the hitchpin block.


Then the longer treble rail, perpendicular to the bass rail, and glued onto the guide rack.


At last! Here is the instrument at the end of Day 5. The major case work has been completed, and everything is fitting just right so far. Next comes the soundboard!

Wednesday, September 2, 2009

Clavichord Day 1 - Wrestplank, Hitchpin Block, and Rim Assembly

Today, we began construction on the clavichord! After some sanding and the like, the first step was to put the rim together with some corner clamps and lasso ties.

Then, we made sure it was nice and square.


Next, the hitchpin block on the left and the wrestplank on the right were glued to the sides of the case with clamps to keep them in place.


Finally, the entire rim was glued together. Here's the instrument at the end of Day 1:


We also started preparations for attaching the case to the bottom, and we're having to use a lot of clamps to make sure it stays square. Hope to get to that ASAP!